Software RAID on Linux: Configuring RAID 0, 1, and 5


Linux supports some disk configurations using Software RAID. The RAID acronym is currently the designation for "Redundant Array of Independent Disks". Software RAID in Linux is implemented through the device driver called md.
RAID enables virtual devices to be created from two or more physical disks. This allows multiple disk units or partitions to be combined into a single virtual device.
The combination of disks in RAID can allow data redundancy, as well as the grouping of disks to form a single volume, or both. With this, the use of RAID allows:
- Performance gain: since data can be spread across multiple disks, allowing parallel reading;
- Redundancy: data can be mirrored, or spread across disks, so that a physical disk failure does not compromise, without data loss;
- Increased capacity: RAID allows combining disks in various ways, generating an increase in storage capacity, reliability and data security;
- Ease of recovering lost data: in case of failure in a disk of the RAID set, data can be recovered through mirroring schemes, or recovery through mathematical parity of the data on the remaining disks;
- Increased security: data can be recovered, increasing system reliability.
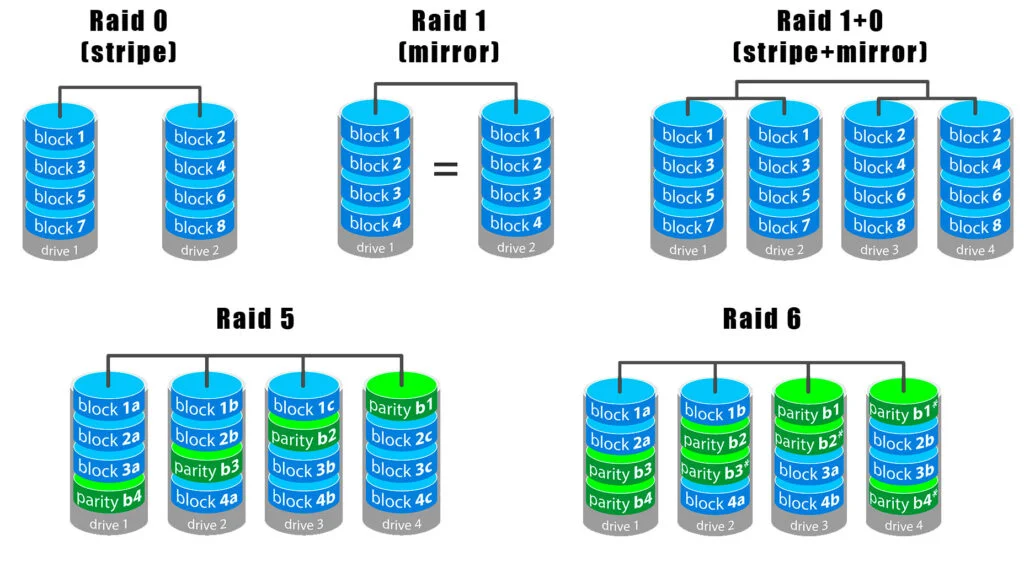
There are basically 5 types of RAID:
- RAID 0: It is known as mirroring. At least 2 disks are required, and data is mirrored. It is the level with the best guarantee against failures, but consumes a lot of disk space, since only half of the disks' capacity is used;
- RAID 1: It is known as striping. At least 2 disks are required, and data is spread. It is the level with the best disk utilization, since the total capacity of the volume will be the sum of the disks. However, this level has no protection against failures.
- RAID 1+0 or RAID 10: It is the combined use of RAID 0 and RAID 1. At least 4 disks are required, and disks must always be added in pairs. It forms a striped mirror set.
- RAID 5: It is known as striping with parity. At least 3 disks are needed. In this scheme data is spread, and a parity calculation is made, in order to ensure that the loss of one disk will not affect the system and there will be no data loss, since data can be recovered from parity.
- RAID 6: it is known as striping with double parity. N+2 disks are needed to guarantee double parity. In this scheme it is possible to "lose" up to 2 disks without data loss.
The Efficiency of Software RAID in Virtual Environments
Software RAID, a technique for managing multiple hard disks in a computer system, has proven to be an efficient and reliable option in virtual environments, such as Virtual Machines (VMs). With the growing popularity of virtualization, the use of software RAID in VMs offers several significant advantages.
Flexibility and Ease of Configuration
One of the greatest benefits of software RAID in VMs is its flexibility. System administrators can configure RAID arrays without the need for specific hardware, such as dedicated RAID controllers. This allows them to adjust the configuration to meet the specific performance and redundancy needs of each VM. Additionally, changes to the RAID configuration can be made easily through software commands, without the need for physical intervention.
Cost-Effectiveness
Software RAID in VMs is a highly cost-effective solution. In many cases, it eliminates the need for dedicated RAID hardware, which can be expensive. This is particularly advantageous for small and medium-sized businesses looking to implement redundancy and performance solutions without a large investment in hardware.
Appropriate Performance
While hardware RAID may offer better performance in some scenarios, software RAID in VMs generally offers sufficient performance for most applications. With advances in processor and disk technology, the performance difference between software and hardware RAID has decreased. In virtual environments, where resources are shared and flexibility is essential, software RAID often meets the needs well.
Ease of Backup and Recovery
Configuring software RAID within VMs facilitates performing backups and data recovery. The ability to create snapshots of the complete VM state, including the RAID configuration, simplifies the backup and recovery process compared to hardware-based solutions.
Compatibility and Portability
Software RAID offers excellent compatibility and portability in virtual environments. Systems based on different virtualization platforms can easily support software RAID, allowing administrators to migrate VMs between hosts without concerns about hardware incompatibilities.
The mdadm Tool
The mdadm tool can be used to create software RAID, in RAID 0, RAID 1, RAID 5, RAID 6 and RAID 10 configurations.
The mandatory options to create a RAID are:
- -C : Creates a RAID disk set;
- -l : specifies the RAID type. The options are: raid0, 0, stripe, raid1, 1, mirror, raid4, 4, raid5, 5, raid6, 6, raid10, 10;
- -n : specifies the number of devices that compose the RAID set;
Example:
To create a RAID 5 with four disks:
# mdadm -C /dev/md0 -l 5 -n 4 /dev/sdb /dev/sdc /dev/sdd /dev/sdeThe command mdadm -C /dev/md0 -l 5 -n 4 /dev/sdb /dev/sdc /dev/sdd /dev/sde is used in Linux to create a RAID array (Redundant Array of Independent Disks) using mdadm, which is a tool for managing RAID on Linux. Let's break down each part of the command:
mdadm: This is the command itself, which invokes the RAID management tool.-C: This option stands for "Create". It is used to create a new RAID array./dev/md0: This is the device name that will be created for the RAID array./dev/md0is a common name for the first RAID array created on a system.-l 5: This option sets the RAID level. The number5indicates that you are creating RAID 5. RAID 5 is popular for providing a good balance between storage efficiency, performance, and data security, as it uses parity to protect against a single disk failure.-n 4: This option specifies the number of devices that will be part of the RAID array. Here,-n 4indicates that there will be four devices in the array./dev/sdb /dev/sdc /dev/sdd /dev/sde: These are the storage devices that will be included in the RAID array. Each one is a separate disk (sdb, sdc, sdd, sde) that will contribute to the RAID 5 array.
The -D option of mdadm shows details about the RAID:
# mdadm -D /dev/md0
/dev/md0:
     Raid Level : raid5
     Array Size : 2056192 (2008.34 MiB 2105.54 MB)
  Used Dev Size : 2056192 (2008.34 MiB 2105.54 MB)
   Raid Devices : 4
  Total Devices : 5
Preferred Minor : 0
   ( … )
Installing mdadm
To install mdadm, which is a tool for managing MD (Multi Disk) RAID devices on Linux, you can follow these steps. The exact commands may vary slightly depending on the Linux distribution you are using. Here are the commands for some of the most popular distributions:
Debian/Ubuntu
- Update Package List:
sudo apt update- Install mdadm:
sudo apt install mdadmFedora
- Install mdadm:
sudo dnf install mdadmCentOS/RHEL
- Install mdadm:
sudo yum install mdadmopenSUSE
- Install mdadm:
sudo zypper install mdadmArch Linux
- Install mdadm:
sudo pacman -S mdadmAfter installation, you can verify that mdadm was installed correctly using:
mdadm --versionor
man mdadmto access the user manual.
Keep in mind that managing RAID is an advanced task and requires a good understanding of how disks and filesystems work on Linux. Always back up your data before modifying disk configurations.
See two examples of how to configure RAID 0 and RAID 1 using mdadm on Linux. Keep in mind that RAID 0 offers better performance and greater total capacity, but without redundancy, while RAID 1 offers data mirroring for greater security.
RAID 0 (striping) example with mdadm
RAID 0 combines two or more disks to form a single larger logical volume with striping, but without redundancy. This increases performance, but if one disk fails, all data in the RAID volume is lost.
- Install
mdadm(if not already installed). - Create a RAID 0 Array: Assuming you have two disks,
/dev/sdband/dev/sdc, the command would be:
sudo mdadm --create --verbose /dev/md0 --level=0 --raid-devices=2 /dev/sdb /dev/sdc- Create a Filesystem: For example, to create an ext4 filesystem:
sudo mkfs.ext4 /dev/md0- Mount the RAID Array: First, create a mount point, for example,
/mnt/raid0, and then mount the array:
   sudo mkdir /mnt/raid0
   sudo mount /dev/md0 /mnt/raid0
RAID 1 (mirroring) example with mdadm
RAID 1 creates an exact mirror of the data on two or more disks. This provides total redundancy; if one disk fails, the data will still be safe on the other disk.
- Install
mdadm(if not already installed). - Create a RAID 1 Array: Assuming you have two disks,
/dev/sdband/dev/sdc, the command would be:
sudo mdadm --create --verbose /dev/md1 --level=1 --raid-devices=2 /dev/sdb /dev/sdc- Create a Filesystem: For example, to create an ext4 filesystem:
sudo mkfs.ext4 /dev/md1- Mount the RAID Array: First, create a mount point, for example,
/mnt/raid1, and then mount the array:
   sudo mkdir /mnt/raid1
   sudo mount /dev/md1 /mnt/raid1
Configuring RAID 6 with mdadm on Linux offers a robust combination of performance and data security. RAID 6 is similar to RAID 5, but uses two parity disks, allowing the failure of up to two disks without data loss. Here is an example of how to configure RAID 6:
RAID 6 (mirroring with double parity) example with mdadm
Suppose you have four disks: /dev/sdb, /dev/sdc, /dev/sdd and /dev/sde. Here are the steps to create a RAID 6 array:
- Install
mdadm:
Make sure thatmdadmis installed on your system. If not, you can install it using your distribution's package manager. For example, on Debian/Ubuntu, you would use:
sudo apt-get install mdadm- Create the RAID 6 Array:
Use the following command to create a RAID 6 array:
sudo mdadm --create --verbose /dev/md0 --level=6 --raid-devices=4 /dev/sdb /dev/sdc /dev/sdd /dev/sdeThis command initializes a RAID 6 array on the device /dev/md0 with four disks.
- Create a Filesystem:
After creating the array, you can create a filesystem on it. For example, to create an ext4 filesystem:
sudo mkfs.ext4 /dev/md0- Mount the RAID Array:
Create a mount point (for example,/mnt/raid6) and mount the array:
   sudo mkdir /mnt/raid6
sudo mount /dev/md0 /mnt/raid6- Configure Persistence:
To ensure the RAID array is mounted automatically at boot, add it to the/etc/mdadm/mdadm.conffile and update the/etc/fstabfile.
- Update
mdadm.conf:bash sudo mdadm --detail --scan | sudo tee -a /etc/mdadm/mdadm.conf - Add the array to
fstab:bash echo '/dev/md0 /mnt/raid6 ext4 defaults,nofail 0 2' | sudo tee -a /etc/fstab
Important Considerations:
- Disk Selection: Make sure the selected disks are free of important data, as the RAID creation process will format them.
- Number of Disks: RAID 6 requires a minimum of four disks.
- Data Backup: Always back up important data before performing partition or disk operations.
- Monitoring and Maintenance: Regularly monitor the health of the RAID array and replace failed disks as quickly as possible to maintain the array's integrity and performance.
- Verify Devices: Always check that the device names (Example:
/dev/sdb,/dev/sdc, etc.) are correct before running these commands.
Test Your Knowledge: Discover How Well You Understand RAID on Linux!
Do you consider yourself a RAID expert on Linux? Or maybe you're just starting to explore this fascinating world of technology? Regardless of where you are in your learning journey, we have something special for you! After absorbing all the valuable information in our article about Software RAID on Linux, we challenge you to test your knowledge with our quiz.
[streamquiz id="63"]
Prof. Uirá Ribeiro
Chair do Board do Linux Professional Institute
After years of watching professionals waste hours on simple tasks because they didn't know the right Linux tools, I decided to teach.
Today I'm the author of most of LPI's official Learning Materials and mentor to over 14,000 certified students.
That was just one piece. The course teaches the whole path — from your first command to exam day.